
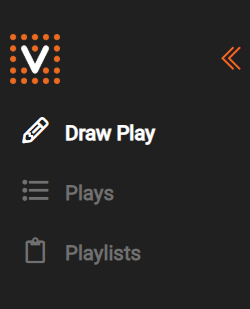
Getting Started
Click “Draw Play” from the left side menu to launch the Draw tool.
Toolbars
Utility Toolbar

The utility toolbar is divided into four sections:
- Undo/Redo: Undo any changes you’ve made or redo any changes you’ve reverted.
- Print/Save: Print a .pdf version of your play or save your play to your profile.
- Playback: Control how you watch your play. From left to right:
- Rewind to the beginning
- Play/pause playback
- Stop playback
- Skip to the end
- Change playback speed
- Court View: Toggle between half court, full court, or custom court view
Drawing Toolbar
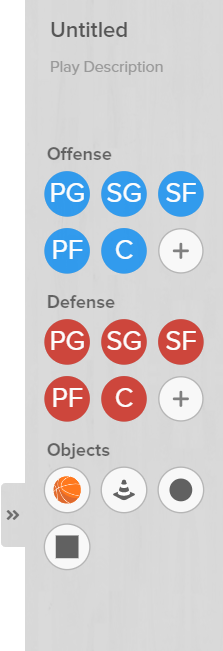
The drawing toolbar along the right side of the screen allows you to edit your play information and add elements to the play from three icon groups:
- Play Info: Give your play a custom name and description. By default, plays are given the name ‘Untitled.’
- Offense/Defense: Player icons are stored here. Add more using the <image> button. Additional icon labels will start at 1 and increment with each new player, per side.
- Objects: Add the ball to the play, as well as any number of cones or generic circle and square shapes to indicate whatever you would like.
Starting to Draw
To add players to the court, click and drag player icons from the play elements toolbar onto the play drawing space. You can have any number of players on the court at a time, regardless of which team they’re on. Players can also be placed out-of-bounds along a sideline or baseline to handle inbound plays. Be sure you’ve assigned the ball to a player for the start of the play before switching over to the Frames tab.
Frames & Adding Actions
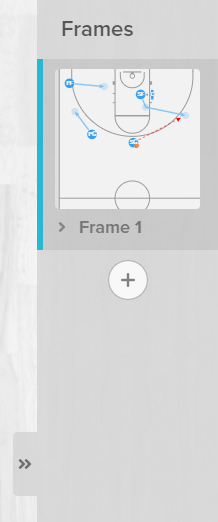
The Frames tab allows coaches to assign actions to players and break plays up into multiple steps. The use of multiple frames makes longer and more complex plays easier to read. To add a frame, click on the plus button below the latest frame. Frames complete sequentially. All actions in one frame are initiated together, the frame finishes once all actions have ceased, then the next frame begins.
Click and drag on a player to move them. Assign basic movement to players without the use of a menu.
All player actions can be accessed by clicking on the desired player. This brings up an action menu next to the selected player with options shown contextually based on the current play state. Here’s an overview of all the actions available to players:
All Players
Adjust Position: Click on the player and their icon will change to a movement indicator. Click and drag on the icon to change its position.

Basic Movement: Click and drag on the player to assign them a straight-line path to follow.

Live Draw Movement: This tool allows you to draw player movement as the rest of the play happens. Click and drag on the player as the play goes on, and the drawing tool will stitch the movement together.

Look: Select a second player to look at for a short duration. This is shown by a field-of-view indicator.
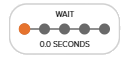
Wait: Add a 0 to 2 second wait delay to the player. They will not perform any actions during this time.
Player with the Ball
Along with the actions available to all players, players with the ball can:

Dribble: When the player is dribbling the ball, the straight arrow movement indicator becomes a squiggly line.

Pass: Select a second player to pass the ball to. Pass types include bounce, chest, hand-off, lob, and skip. Each pass has a different speed setting which can be changed manually.

Shoot: Shoot the ball at the basket. Players in the model have 100% accuracy for demonstration’s sake.
Player without the Ball
Along with the actions available to all players, players without the ball can:

Screen: Set a screen with the selected player. When this action is first chosen, a colored ring with a small arrow will appear around the player. Click and drag on the ring to orient the screen. You can change the orientation later by clicking on the player and selecting the Adjust Angle ![]() button.
button.
Removing Actions
To clear an action, select it and click on either the Remove Location ![]() button for movement actions or the Clear Action
button for movement actions or the Clear Action ![]() button for all other action types. If the cleared action was one in a chain of actions, the drawing tool will close the gap between actions if necessary.
button for all other action types. If the cleared action was one in a chain of actions, the drawing tool will close the gap between actions if necessary.